Öffnen-Dialog - Gestaltungsvorlage

Hauptkomponenten
Ansichten
Menüs
Dialoge
Apply Template
You can create a custom style worksheet (template), containing the visual settings of one or more objects of the same or different types, so that those settings can be then applied to objects in other GeoGebra files.
How to make a template file
Create a GeoGebra file (which will be saved later, using a proper name, e.g. style.ggb), containing the objects that will define the custom styles, e.g. some points, lines or polygons. Now use the Object Properties dialog or the style bar and modify the default style of each object, applying e.g. a different colour, size or filling.
Now you need to assign a unique name to the custom style of each object: open Basic tab of the Object Properties dialog and enter in the Caption field of each object %style=StyleName, where StyleName is a name of your choice.
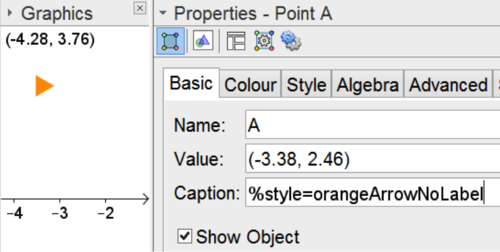
The following picture shows the assignment of the style name %style=orangeArrowNoLabel to the displayed point: following the same procedure we may create other points or objects, having different styles, and assign them different style names.
- Beispiel:

If you want a defined style to apply to all the objects of the same type, then you need to enter in the Caption field of the defining object the reserved name: %style=defaultStyle
Now save your file containing the custom styles template, for example as style.ggb.
How to apply a template file to a .ggb file
Open or create the file that you want to apply the style template to, then type %style=StyleName in the Caption field of each object that will get that special style.
Referring to the previous example, you need to type %style=orangeArrowNoLabel in the Caption field of each point you want to display as the point you defined in the template file.
This step is not necessary for the objects you want to assume the %style=defaultStyle.
Verify that no objects are selected and save your file, then in the menu bar click File - Open ....
Then select item Apply template (.ggb) from the File type dropdown list, shown in the appearing dialog window. Select the file containing the style template (referring to the previous example, select the style.ggb file) to apply the custom styles to the assigned objects.
