Knoppenbalk: verschil tussen versies

| Regel 32: | Regel 32: | ||
Wanneer je verandert van venster, verandert tegelijk de ''Knoppenbalk''. Ook een ''Venster'', dat je opent in een apart scherm, heeft zijn eigen ''Knoppenbalk''. | Wanneer je verandert van venster, verandert tegelijk de ''Knoppenbalk''. Ook een ''Venster'', dat je opent in een apart scherm, heeft zijn eigen ''Knoppenbalk''. | ||
| − | = | + | =De koppenbalk aanpassen= |
| − | == | + | ==Een aangepaste knoppenbalk creëren== |
| − | + | Je kunt de verschillende ''knoppenbalken'' aanpassen door ''Knoppenbalk aanpassen'' te selecteren in het menu [[File:Menu-tools.svg|link=|18px]] ''[[Macro's Menu|Knoppen]]''. | |
<br><br> | <br><br> | ||
'''GeoGebra Desktop''' | '''GeoGebra Desktop''' | ||
| − | * | + | *Selecteer het ''venster'' waarvan je de ''knoppenbalk'' wil aanpassen. |
*To '''remove a ''Tool'' or entire ''Toolbox''''' from the custom ''Toolbar'', select it in the list on the left hand side of the appearing dialog window and click the button ''Remove >''. | *To '''remove a ''Tool'' or entire ''Toolbox''''' from the custom ''Toolbar'', select it in the list on the left hand side of the appearing dialog window and click the button ''Remove >''. | ||
*To '''add a Tool''' to your custom Toolbar, select it in the right list and click the button ''< Insert''. | *To '''add a Tool''' to your custom Toolbar, select it in the right list and click the button ''< Insert''. | ||
Versie van 31 jan 2016 16:18
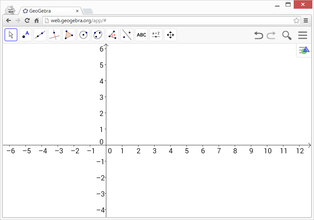
Standaard wordt de Knoppenbalk getoond bovenaan in het GeoGebra scherm of net onder de Menubalk (GeoGebra Desktop). De knoppenbalk is onderverdeeld in rolmenu's, waarin gelijkaardige knoppen gegroepeerd werden.

|
Help bij een knop
Bij het selecteren van een knop, verschijnt een zgn. tooltip met uitleg over het gebruik van de knop.
Gebruik je ![]() GeoGebra Desktop, dan kan je in de menubalk op Help klikken. In het dialoogvenster kan je Initiatiehandleidingen selecteren om met GeoGebra te leren werken. In Handleiding kan je meer uitleg opzoeken over de knop. Je kunt ook doorverbinden naar het online Gebruikersforum om meer uitleg te vragen.
GeoGebra Desktop, dan kan je in de menubalk op Help klikken. In het dialoogvenster kan je Initiatiehandleidingen selecteren om met GeoGebra te leren werken. In Handleiding kan je meer uitleg opzoeken over de knop. Je kunt ook doorverbinden naar het online Gebruikersforum om meer uitleg te vragen.
Je kunt ook helemaal rechts in de knoppenbalk op het vraagteken klikken om het dialoogvenster Help te openen. Hierin kan je verder doorklikken naar Toon online help.
Verschillende knoppenbalken voor verschillende vensters
Elk venster behalve het ![]() Algebra venster heeft zijn eigen knoppenbalk, met de knoppen die passen bij het venster waarin je werkt.
Algebra venster heeft zijn eigen knoppenbalk, met de knoppen die passen bij het venster waarin je werkt.
| Tekenvenster Knoppenbalk | |
| 3D Tekenvenster Knoppenbalk | |
| CAS Knoppenbalk | |
| Rekenblad Knoppenbalk |
Wanneer je verandert van venster, verandert tegelijk de Knoppenbalk. Ook een Venster, dat je opent in een apart scherm, heeft zijn eigen Knoppenbalk.
De koppenbalk aanpassen
Een aangepaste knoppenbalk creëren
Je kunt de verschillende knoppenbalken aanpassen door Knoppenbalk aanpassen te selecteren in het menu ![]() Knoppen.
Knoppen.
GeoGebra Desktop
- Selecteer het venster waarvan je de knoppenbalk wil aanpassen.
- To remove a Tool or entire Toolbox from the custom Toolbar, select it in the list on the left hand side of the appearing dialog window and click the button Remove >.
- To add a Tool to your custom Toolbar, select it in the right list and click the button < Insert.
- To add a Tool to a new Toolbox, select a Toolbox in the left list and the Tool you want to insert in the right list. Then, click < Insert. Your Tool is inserted as part of a new Toolbox below the selected Toolbox.
- To add a Tool to an existing Toolbox, open the Toolbox in the left list and select the Tool above the desired position of the new Tool. Then, select the Tool from the right list and click < Insert.
- To move a Tool from one Toolbox to another, you need to remove the Tool first and then add it to the other Toolbox.
GeoGebra Web and Tablet Apps
- In the right upper corner of the GeoGebra window, select the Toolbar of the View you want to edit.
- To remove a Tool or entire Toolbox from the custom Toolbar, select it in the list on the left hand side of the appearing dialog window and drag and drop it in the right list.
- To add a Tool to your custom Toolbar, select it in the right list and drag and drop it in the left list.
- To add a Tool to a new Toolbox, select the Tool you want to insert in the right list and drag and drop it below a Toolbox in the left list. Your Tool is inserted as part of a new Toolbox below the other Toolbox.
- To add a Tool to an existing Toolbox, open the Toolbox in the left list. Select a Tool in the right list and drag and drop that Tool below a Tool of the opened Toolbox in the left list.
- To move a Tool from one Toolbox to another, open both Toolboxes, select a Tool and drag and drop it in the other Toolbox.
Changing the Position of the Toolbar
In GeoGebra Desktop, you can change the position of the Toolbar using the Layout option in the View Menu.
Changing the Toolbar in a GeoGebra Applet
The appearance of the Toolbar in a Dynamic Worksheets can be set using the customToolBar parameter.


