CAS venster: verschil tussen versies

| Regel 2: | Regel 2: | ||
{{gui|view}} | {{gui|view}} | ||
| − | =[[File:Menu_view_cas.svg|link=|24px]] CAS | + | =[[File:Menu_view_cas.svg|link=|24px]] CAS venster= |
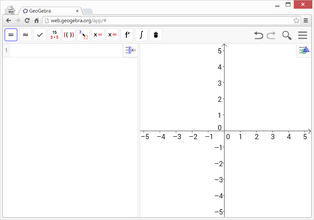
| − | + | Standaard wordt het [[File:Menu_view_cas.svg|link=|16px]] ''CAS venster'' geopend naast het [[File:Menu_view_graphics.svg|link=Graphics View|16px]] ''[[Tekenvenster]]''. Naargelang welk van de twee ''vensters'' actief is, staat de Knoppenbalk van het CAS venster of het Tekenvenster bovenaan in het GeoGebra-scherm met de knoppen ''Ongedaan maken / Opnieuw'' rechtsboven. | |
{| cellpadding ="10" | {| cellpadding ="10" | ||
|[[File:CAS-View.png|left|link=|x220px]] | |[[File:CAS-View.png|left|link=|x220px]] | ||
| − | <br>CAS | + | <br>CAS venster |
|} | |} | ||
| − | + | Het [[File:Menu_view_cas.svg|link=|16px]] ''CAS venster'' is een deel van de [[Schermindelingen|''Schermindeling'']] CAS, maar je kunt het CAS venster ook openen in andere schermindelingen via het menu [[Views|Beeld]]. | |
| − | = | + | =Wiskundige Objecten creëren= |
| − | == | + | ==Rechtstreekse invoer== |
| − | + | In het ''CAS venster'' kan je met het CAS (Computer Algebra Systeem) van GeoGebra symbolisch rekenen. Het is opgebouwd uit cellen met een ''Invoerveld'' bovenaan en een toonveld onderaan. Je kunt deze ''Invoervelden'' op dezelfde manier gebruiken als het gewone ''[[Invoerveld]]'', met volgende verschillen: | |
| − | * | + | * Je kunt variabelen gebruiken waaraan geen waarde werd toegekend. {{Example|1=Typ <code>(a+b)^2</code> in een ''Invoerveld'' en klik op de {{KeyCode|Enter}}-toets. Je krijgt als resultaat ''a²+2ab+b²''.}} |
| − | * <code>=</code> | + | * <code>=</code> wordt gebrukt in vergelijkingen en <code>:=</code> voor toewijzingen. Dit betekent dat de invoer <code>a=2</code> de waarde 2 niet toekent aan de variabele ''a''. Je doet dit wel met de invoer a<code>:=</code>2. |
| − | * | + | * Vermenigvuldiging moet je expliciet vermelden. In het ''[[Invoerveld]]'' kan je zowel <code>a(b+c)</code> als <code>a*(b+c)</code> typen voor een vermenigvuldiging, in het [[File:Menu_view_cas.svg|link=|16px]] ''CAS venster'' is enkel <code>a*(b+c)</code> geldig. |
==Keyboard Shortcuts for Direct Input== | ==Keyboard Shortcuts for Direct Input== | ||
Versie van 30 apr 2015 15:51
 CAS venster
Standaard wordt het ![]() CAS venster geopend naast het
CAS venster geopend naast het ![]() Tekenvenster. Naargelang welk van de twee vensters actief is, staat de Knoppenbalk van het CAS venster of het Tekenvenster bovenaan in het GeoGebra-scherm met de knoppen Ongedaan maken / Opnieuw rechtsboven.
Tekenvenster. Naargelang welk van de twee vensters actief is, staat de Knoppenbalk van het CAS venster of het Tekenvenster bovenaan in het GeoGebra-scherm met de knoppen Ongedaan maken / Opnieuw rechtsboven.
|
Het ![]() CAS venster is een deel van de Schermindeling CAS, maar je kunt het CAS venster ook openen in andere schermindelingen via het menu Beeld.
CAS venster is een deel van de Schermindeling CAS, maar je kunt het CAS venster ook openen in andere schermindelingen via het menu Beeld.
Wiskundige Objecten creëren
Rechtstreekse invoer
In het CAS venster kan je met het CAS (Computer Algebra Systeem) van GeoGebra symbolisch rekenen. Het is opgebouwd uit cellen met een Invoerveld bovenaan en een toonveld onderaan. Je kunt deze Invoervelden op dezelfde manier gebruiken als het gewone Invoerveld, met volgende verschillen:
- Je kunt variabelen gebruiken waaraan geen waarde werd toegekend. Voorbeeld: Typ
(a+b)^2in een Invoerveld en klik op de Sjabloon:KeyCode-toets. Je krijgt als resultaat a²+2ab+b². =wordt gebrukt in vergelijkingen en:=voor toewijzingen. Dit betekent dat de invoera=2de waarde 2 niet toekent aan de variabele a. Je doet dit wel met de invoer a:=2.- Vermenigvuldiging moet je expliciet vermelden. In het Invoerveld kan je zowel
a(b+c)alsa*(b+c)typen voor een vermenigvuldiging, in het CAS venster is enkel
 a*(b+c)geldig.
Keyboard Shortcuts for Direct Input
In the ![]() CAS View the following keyboard shortcuts help you to evaluate or check your input.
CAS View the following keyboard shortcuts help you to evaluate or check your input.
- Sjabloon:KeyCode: Evaluates you input
- Sjabloon:KeyCode: Evaluates your input numerically Voorbeeld:
sqrt(2)yields 1.41 - Sjabloon:KeyCode: Checks your input but does not evaluate it. Voorbeeld:
b + bstays as b + b.Nota: Assignments are always evaluated, e.g.a := 5
In the ![]() CAS View the following keyboard shortcuts help you to reuse previous input or output in a new row if you enter them into an empty Input Field:
CAS View the following keyboard shortcuts help you to reuse previous input or output in a new row if you enter them into an empty Input Field:
- Sjabloon:KeyCode bar: Inserts the previous output into the new row.
): Inserts the previous output in parentheses.=: Inserts the previous input into the new row.
a := 5;.Variable Assignments and Connection with other Views
You may use the := notation for assignments, e.g. b := 5, a(n) := 2n + 3.
- Free up a name: Use
Delete[b]in order to free up a variable name again. - Redefine a variable or function: You may redefine a variable or function, but you must do so in the same cell, otherwise it will be treated as a new variable and automatically renamed.
Variables and functions are always shared between the CAS View and the other Views if possible. For example:
- If you define
b:=5in the CAS View, then you can use b in all the other Views of GeoGebra. - If you define a function
f(x)=x^2in another View, you can also use this function in the CAS View.
:=, e.g. if you type b:=5 the output will be 5. Please also note, that for clarification actually b := 5 will be displayed.Equations
- You may write equations using the simple Equals sign, e.g.
3x + 5 = 7. - Arithmetic operations: You can perform arithmetic operations on equations, which is useful for manual equation solving. Voorbeeld:
(3x + 5 = 7) - 5subtracts 5 from both sides of the equation. - Extracting one Side: You may extract either the left or right side of an equation by using the commands
LeftSide[]andRightSide[].Voorbeeld:LeftSide[3x + 5 = 7]returns 3 x + 5 andRightSide[3x + 5 = 7]returns 7
Row References
You can refer to other rows in the ![]() CAS View in two ways:
CAS View in two ways:
- Static row references copy the output and won't be updated if the referenced row is subsequently changed
#: Copies the previous output.#5: Copies the output of row 5.
- Dynamic row references insert a reference to another row instead of the actual output and therefore will be updated if the referenced row is subsequently changed
$: Inserts a reference to the previous output.$5: Inserts a reference to the output of row 5
CAS Commands
GeoGebra also offers a wide range of CAS Commands that can be used to create objects in the ![]() CAS View. Just start typing the name of a Command into the Input Field and GeoGebra will offer you a list of Commands that match your input.
CAS View. Just start typing the name of a Command into the Input Field and GeoGebra will offer you a list of Commands that match your input.
.
CAS View Toolbar
The CAS View Toolbar provides a range of CAS Tools that can be operated with the mouse and allow you to evaluate input and perform calculations. Just enter your input and use the mouse to click on the corresponding CAS Tool afterwards in order to apply it to your input.
Context Menus
Row Header Context Menu
Right click (MacOS: Sjabloon:KeyCode-click) on a row header in order to show a Context Menu with the following options:
- Insert Above: Inserts an empty row above the current one.
- Insert Below: Inserts an empty row below the current one.
- Delete Row: Deletes the contents of the current row.
- Text: Toggles between the current result and a text showing the current result contained in the row, which allows the user to insert comments.
- Copy as LaTeX (GeoGebra Desktop): Copies the contents of the current row to your computer’s clipboard, allowing you to paste the contents e.g. in a Text object.
- Nota: To copy the contents of more than one CAS row as LaTeX, select the rows you want with Sjabloon:KeyCode-click (MacOS: Sjabloon:KeyCode-click), then right-click (MacOS: Sjabloon:KeyCode-click) on the row header and select Copy as LaTeX.
Cell Context Menu
In GeoGebra Desktop, right click (MacOS: Sjabloon:KeyCode-click) on a CAS output cell in order to show a Context Menu with the following options:
- Copy: Copies the cell contents to the your computer’s clipboard. Then, right click on a new cell in order to show the Paste option.
- Copy as LaTeX: Copies the cell contents in LaTeX format to the your computer’s clipboard, so it can be pasted into a Text object or a LaTeX editor.
- Copy as LibreOffice Formula: Copies the cell contents in LibreOffice formula format to your computer’s clipboard, so it can be pasted in a word processing document.
- Copy as Image: Copies the cell contents in PNG format to your computer’s clipboard, so it can be pasted into an Image object or in a word processing document.
Display of Mathematical Objects
CAS View Style Bar
The CAS View Style Bar provides buttons to
 change the text style (
 bold and
  italics) and
  color
color- display a
 virtual keyboard (GeoGebra Desktop)
 - display additional
 Views in the GeoGebra window (GeoGebra Web and Tablet Apps)
Showing CAS Objects in the  Graphics View
In the ![]() CAS View, the icon to the left of every row shows the current visibility state (shown or hidden) of the object defined in it (when possible). You may directly click on the little
CAS View, the icon to the left of every row shows the current visibility state (shown or hidden) of the object defined in it (when possible). You may directly click on the little ![]() Show / Hide Object icon in order to change the visibility status of the object in the
Show / Hide Object icon in order to change the visibility status of the object in the ![]() Graphics View.
Graphics View.