Difference between revisions of "Spreadsheet View"

m (templates) |
(→Direct Input and Commands: added shortcut Ctrl+clic) |
||
| (33 intermediate revisions by 5 users not shown) | |||
| Line 1: | Line 1: | ||
<noinclude>{{Manual Page}}[[Category:Manual (official)|{{PAGENAME}}]]</noinclude> | <noinclude>{{Manual Page}}[[Category:Manual (official)|{{PAGENAME}}]]</noinclude> | ||
| − | {{gui|view}} | + | <noinclude>{{Manual Page|version=5.0}}</noinclude>{{gui|view}} |
| + | =Spreadsheet View User Interface= | ||
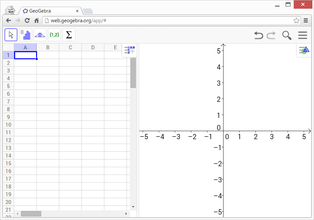
| + | By default, the [[File:Menu_view_spreadsheet.svg|link=|16px]] ''Spreadsheet View'' is opened next to the [[File:Menu_view_graphics.svg|link=|16px]] ''[[Graphics View]]''. The [[Spreadsheet Tools|''Spreadsheet View Toolbar'']] is displayed at the top of the GeoGebra window, with the [[File:Menu-edit-undo.svg|link=|16px]][[File:Menu-edit-redo.svg|link=|16px]] ''Undo / Redo'' buttons in the top right corner. | ||
| + | {| cellpadding ="10" | ||
| + | |[[File:Spreadsheet-View.png|left|link=|x220px]] | ||
| + | <br>Spreadsheet View | ||
| + | |} | ||
| − | + | The [[File:Menu_view_spreadsheet.svg|link=|16px]] ''Spreadsheet View'' is part of the [[File:Menu view spreadsheet.svg|link=|16px]] [[Perspectives#Spreadsheet Perspective|''Spreadsheet Perspective'']], although you may [[GeoGebra_5.0_Desktop_vs._Web_and_Tablet_App#Customizing_the_Layout_of_the_User_Interface|change the layout]] of GeoGebra's user interface according to your needs. | |
| − | :''' | + | ==Customizing the [[File:Menu_view_spreadsheet.svg|link=|24px]] Spreadsheet View== |
| + | The [[File:Menu_view_spreadsheet.svg|link=|16px]] ''Spreadsheet View'' can be customized according to your preferences by | ||
| + | *opening the [[File:Menu-options.svg|link=|16px]] ''[[Preferences Dialog]]'' and selecting the option [[File:Menu_view_spreadsheet.svg|link=|16px]] ''Spreadsheet'' (GeoGebra Desktop) | ||
| + | *opening the [[File:Stylingbar_icon_spreadsheet.svg|link=|16px]] [[Style_Bar#Spreadsheet_View_Style_Bar|''Spreadsheet View Style Bar'']] and selecting [[File:Menu-options.svg|link=|16px]] ''Preferences'' (GeoGebra Web and Tablet Apps) | ||
| − | In the | + | In the appearing dialog window you may change the layout by choosing whether to |
| + | *Show the ''[[Input Bar]]'' | ||
| + | *Show ''Gridlines'' | ||
| + | *Show the ''Column'' or ''Row Header'' | ||
| + | *Show ''Vertical'' or ''Horizontal Scrollbars'' | ||
| − | :'''Note:''' By default, | + | In addition, you may change the behavior of the [[File:Menu_view_spreadsheet.svg|link=|16px]] ''Spreadsheet View'' by |
| + | *allowing ''Use of Buttons and Checkboxes'' or ''Tooltips'' | ||
| + | *requiring ''"=" before Commands'' | ||
| + | *using ''Auto-complete'' | ||
| + | |||
| + | =Creating Mathematical Objects= | ||
| + | In GeoGebra’s [[File:Menu_view_spreadsheet.svg|link=|16px]] ''Spreadsheet View'' every cell has a specific name that allows you to directly address each cell. | ||
| + | {{Example|1=The cell in column ''A'' and row ''1'' is named ''A1''.}} | ||
| + | {{note|These cell names can be used in expressions and ''[[Commands]]'' in order to address the content of the corresponding cell.}} | ||
| + | |||
| + | ==Direct Input, Selection and Commands== | ||
| + | In the ''Spreadsheet Cells'' you can enter not only numbers, but all types of [[General Objects]] and [[Geometrical Objects]] that are supported by GeoGebra (e.g. coordinates of points, [[Functions]], [[Commands]]). | ||
| + | |||
| + | To select non adjacent columns or cells in the spreadsheet, use the shortcut {{KeyCode|Ctrl+Click}}. | ||
| + | |||
| + | ==Relative Cell Names== | ||
| + | If you copy content from one cell to another, by default all references are changed accordingly to the target position. | ||
| + | {{Example|1=Let <code>A1=1</code>, <code>A2=2</code>. In ''B1'' put <code>(A1, A1)</code>. By copying ''B1'' to ''B2'' (either via {{keyCode|Ctrl+C}}, {{keyCode|Ctrl+V}} or by dragging the cell corner) you get ''(A2, A2)'' in ''B2''.}} | ||
| + | To prevent this behavior, you can insert <code>$</code> before the column and/or row of the referenced cell. | ||
| + | {{Note|On Mac OS the Copy & Paste [[Keyboard Shortcuts|shortcuts]] are {{keyCode|Cmd+C}} and {{keyCode|Cmd+V}}}} | ||
| + | |||
| + | =Input Data into the [[File:Menu_view_spreadsheet.svg|link=|24px]] Spreadsheet View= | ||
| + | ==Manual Entry, Commands, and Tracing== | ||
| + | Besides manually adding entries into the [[File:Menu_view_spreadsheet.svg|link=|16px]] ''Spreadsheet View'' cells, you may use the commands [[FillColumn Command|''FillColumn'']], [[FillRow Command|''FillRow'']] or [[FillCells Command|''FillCells'']]. You can also enter data by using the feature [[Tracing#Tracing to Spreadsheet|''Tracing to Spreadsheet'']]. | ||
| + | |||
| + | ==Copy Data from the [[File:Menu_view_algebra.svg|link=|16px]] Algebra View== | ||
| + | With a simple drag and drop operation it is also possible to copy objects from the [[File:Menu_view_algebra.svg|link=|16px]] ''[[Algebra View]]'' to the [[File:Menu_view_spreadsheet.svg|link=|16px]] ''Spreadsheet View''. If you drag a list, its elements will be pasted horizontally, starting from the cell in which you release the left mouse button or touchscreen. | ||
| + | Pressing the {{KeyCode|Shift}} key while dragging opens a dialog window when the mouse button is released, allowing you to choose whether the pasted objects will be [[Free,_Dependent_and_Auxiliary_Objects|Free or Dependent]], as well as to choose the vertical placement of the copied objects (check option ''Transpose''). | ||
| + | |||
| + | ==Copy Data from Other Spreadsheet Software== | ||
| + | GeoGebra allows you to import data from other spreadsheet software into the [[File:Menu_view_spreadsheet.svg|link=|16px]] ''Spreadsheet View''. | ||
| + | *Select and copy the data you want to import. For example, you may use the keyboard shortcut {{KeyCode|Ctrl+C}} (Mac OS: {{KeyCode|Cmd+C}}) in order to copy the data to your computer’s clipboard. | ||
| + | *Open a GeoGebra window and show the [[File:Menu_view_spreadsheet.svg|link=|16px]] ''Spreadsheet View''. | ||
| + | *Click on the spreadsheet cell that should contain the first data value (e.g. cell ''A1'') | ||
| + | *Paste the data from your computer’s clipboard into GeoGebra’s [[File:Menu_view_spreadsheet.svg|link=|16px]] ''Spreadsheet View''. For example, you may select a cell and use the keyboard shortcut {{KeyCode|Ctrl+V}} (Mac OS: {{KeyCode|Cmd+V}}) in order to paste the data into the highlighted spreadsheet cell. | ||
| + | . | ||
| + | ==Import Data Files from other Applications== | ||
| + | You can also import data from other applications, if stored using .''txt'', .''csv'' and .''dat'' formats. Simply right click on a free cell of the [[File:Menu_view_spreadsheet.svg|link=|16px]] ''Spreadsheet View'', then choose the ''Import Data File...'' option. | ||
| + | {{Note|1=GeoGebra uses the dot {{KeyCode|.}} as decimal separator, and the comma {{KeyCode|,}} as field separator. Ensure to check if your data file matches these settings before importing.}} | ||
| + | |||
| + | ==Spreadsheet View Toolbar== | ||
| + | The [[Spreadsheet Tools|''Spreadsheet View Toolbar'']] provides a range of ''[[Tools]]'' that allow you to create objects in the [[File:Menu_view_spreadsheet.svg|link=|16px]] ''Spreadsheet View''. | ||
| + | Every icon in the ''[[Toolbar]]'' represents a [[Tools#Toolboxes|''Toolbox'']] that contains a selection of related ''[[Tools]]''. In order to open a ''Toolbox'', you need to click on the corresponding default ''Tool'' shown in the ''Spreadsheet View Toolbar'' (GeoGebra Web and Tablet Apps) or on the small arrow in the lower right corner of the ''Toolbar'' icon (GeoGebra Desktop). | ||
| + | |||
| + | [[File:Toolbar-Spreadsheet.png|left|link=|Spreadsheet Tools|x32px]] | ||
| + | <br> | ||
| + | <br> | ||
| + | |||
| + | {{note|The ''Tools'' of the ''Spreadsheet View Toolbar'' are organized by the nature of resulting objects or their functionality. For example, you will find ''Tools'' that analyze data in the [[File:Mode_onevarstats.svg|link=|One Variable Analysis Tool|16px]] [[Spreadsheet Tools|''Data Analysis Toolbox'']].}} | ||
| + | |||
| + | =Display of Mathematical Objects= | ||
| + | ==Display of Spreadsheet Objects in other Views== | ||
| + | If possible, GeoGebra immediately displays the graphical representation of the object you entered in a ''Spreadsheet Cell'' in the [[File:Menu_view_graphics.svg|link=|16px]] ''[[Graphics View]]'' as well. Thereby, the name of the object matches the name of the ''Spreadsheet Cell'' used to initially create it (e.g. ''A5'', ''C1''). | ||
| + | |||
| + | {{note|By default, ''Spreadsheet Objects'' are classified as [[Free, Dependent and Auxiliary Objects#Auxiliary Objects|''Auxiliary Objects'']] in the [[File:Menu_view_algebra.svg|link=|16px]] ''[[Algebra View]]''. You can show or hide these ''Auxiliary Objects'' by selecting ''Auxiliary Objects'' from the ''[[Context Menu]]'' or by clicking on the [[File:Stylingbar_algebraview_auxiliary_objects.svg|link=|16px]] icon in the [[Algebra View#Algebra View Style Bar|''Algebra View Style Bar'']]}} | ||
| + | |||
| + | ==Using Spreadsheet Data in other ''Views''== | ||
| + | You may process the ''Spreadsheet Data'' by selecting multiple cells and right-clicking (Mac OS: {{KeyCode|Cmd}}-clicking) on the selection. In the appearing ''[[Context Menu]]'', choose the submenu ''Create'' and select the appropriate option (''List'', ''List of points'', ''Matrix'', ''Table'', ''Polyline'' and ''Operation table''). | ||
| + | |||
| + | ==Operation Table== | ||
| + | For a function with two parameters you can create an ''Operation Table'' with values of the first parameter written in the top row and values of second parameter written in the left column. The function itself must be entered in the top left cell. | ||
| + | |||
| + | After entering the function and the parameter values in the appropriate cells, select the rectangular area of the desired ''Operation Table'' with the mouse. Then, right click (Mac OS: {{KeyCode|Cmd}}-click) on the selection and choose option ''Create > Operation Table'' of the appearing ''[[Context Menu]]''. | ||
| + | {{Example|1= Let <code>A1 = x y</code>, <code>A2 = 1</code>, <code>A3 = 2</code>, <code>A4 = 3</code>, <code>B1 = 1</code>, <code>C1 = 2</code> and <code>D1 = 3</code>. Select cells ''A1:D4'' with the mouse. Then, right click (Mac OS: {{KeyCode|Cmd}}-click) on the selection and choose ''Create > Operation Table'' in the ''[[Context Menu]]'' to create a table containing the results of substitution of the inserted values in the given function.}} | ||
| + | |||
| + | ==Spreadsheet View Style Bar== | ||
| + | The [[Style_Bar#Spreadsheet_View_Style_Bar|''Spreadsheed View Style Bar'']] provides buttons to | ||
| + | *show / hide the ''[[Input Bar]]'' (GeoGebra Desktop) | ||
| + | *change the text style to [[File:Stylingbar_text_bold.svg|link=|16px]] '''bold''' or [[File:Stylingbar_text_italic.svg|link=|16px]] ''italic'' | ||
| + | *set the text alignment to [[File:Stylingbar_spreadsheet_align_left.svg|link=|16px]] ''left'', [[File:Stylingbar_spreadsheet_align_center.svg|link=|16px]] ''center'', or [[File:Stylingbar_spreadsheet_align_right.svg|link=|16px]] ''right'' | ||
| + | *change the [[File:Stylingbar_color_white.svg|link=|16px]] background color of a cell | ||
| + | *change the cell borders (GeoGebra Desktop) | ||
| + | *open the [[File:Menu-options.svg|link=|16px]] ''[[Properties Dialog]]'' (GeoGebra Web and Tablet Apps) | ||
| + | *display additional [[File:Stylingbar_dots.svg|link=|16px]] [[Views|''Views'']] in the GeoGebra window (GeoGebra Web and Tablet Apps) | ||
Latest revision as of 12:27, 12 January 2019
Spreadsheet View User Interface
By default, the ![]() Spreadsheet View is opened next to the
Spreadsheet View is opened next to the ![]() Graphics View. The Spreadsheet View Toolbar is displayed at the top of the GeoGebra window, with the
Graphics View. The Spreadsheet View Toolbar is displayed at the top of the GeoGebra window, with the ![]()
![]() Undo / Redo buttons in the top right corner.
Undo / Redo buttons in the top right corner.
|
The ![]() Spreadsheet View is part of the
Spreadsheet View is part of the ![]() Spreadsheet Perspective, although you may change the layout of GeoGebra's user interface according to your needs.
Spreadsheet Perspective, although you may change the layout of GeoGebra's user interface according to your needs.
Customizing the  Spreadsheet View
The ![]() Spreadsheet View can be customized according to your preferences by
Spreadsheet View can be customized according to your preferences by
- opening the
 Preferences Dialog and selecting the option
  Spreadsheet (GeoGebra Desktop)
 - opening the
 Spreadsheet View Style Bar and selecting Preferences (GeoGebra Web and Tablet Apps)
In the appearing dialog window you may change the layout by choosing whether to
- Show the Input Bar
- Show Gridlines
- Show the Column or Row Header
- Show Vertical or Horizontal Scrollbars
In addition, you may change the behavior of the ![]() Spreadsheet View by
Spreadsheet View by
- allowing Use of Buttons and Checkboxes or Tooltips
- requiring "=" before Commands
- using Auto-complete
Creating Mathematical Objects
In GeoGebra’s ![]() Spreadsheet View every cell has a specific name that allows you to directly address each cell.
Spreadsheet View every cell has a specific name that allows you to directly address each cell.
Direct Input, Selection and Commands
In the Spreadsheet Cells you can enter not only numbers, but all types of General Objects and Geometrical Objects that are supported by GeoGebra (e.g. coordinates of points, Functions, Commands).
To select non adjacent columns or cells in the spreadsheet, use the shortcut Ctrl + Click.
Relative Cell Names
If you copy content from one cell to another, by default all references are changed accordingly to the target position.
A1=1, A2=2. In B1 put (A1, A1). By copying B1 to B2 (either via Ctrl + C, Ctrl + V or by dragging the cell corner) you get (A2, A2) in B2.To prevent this behavior, you can insert $ before the column and/or row of the referenced cell.
Input Data into the Spreadsheet View
Manual Entry, Commands, and Tracing
Besides manually adding entries into the ![]() Spreadsheet View cells, you may use the commands FillColumn, FillRow or FillCells. You can also enter data by using the feature Tracing to Spreadsheet.
Spreadsheet View cells, you may use the commands FillColumn, FillRow or FillCells. You can also enter data by using the feature Tracing to Spreadsheet.
Copy Data from the  Algebra View
With a simple drag and drop operation it is also possible to copy objects from the ![]() Algebra View to the
Algebra View to the ![]() Spreadsheet View. If you drag a list, its elements will be pasted horizontally, starting from the cell in which you release the left mouse button or touchscreen.
Pressing the Shift key while dragging opens a dialog window when the mouse button is released, allowing you to choose whether the pasted objects will be Free or Dependent, as well as to choose the vertical placement of the copied objects (check option Transpose).
Spreadsheet View. If you drag a list, its elements will be pasted horizontally, starting from the cell in which you release the left mouse button or touchscreen.
Pressing the Shift key while dragging opens a dialog window when the mouse button is released, allowing you to choose whether the pasted objects will be Free or Dependent, as well as to choose the vertical placement of the copied objects (check option Transpose).
Copy Data from Other Spreadsheet Software
GeoGebra allows you to import data from other spreadsheet software into the ![]() Spreadsheet View.
Spreadsheet View.
- Select and copy the data you want to import. For example, you may use the keyboard shortcut Ctrl + C (Mac OS: Cmd + C) in order to copy the data to your computer’s clipboard.
- Open a GeoGebra window and show the Spreadsheet View.
- Click on the spreadsheet cell that should contain the first data value (e.g. cell A1)
- Paste the data from your computer’s clipboard into GeoGebra’s Spreadsheet View. For example, you may select a cell and use the keyboard shortcut Ctrl + V (Mac OS: Cmd + V) in order to paste the data into the highlighted spreadsheet cell.
.
Import Data Files from other Applications
You can also import data from other applications, if stored using .txt, .csv and .dat formats. Simply right click on a free cell of the ![]() Spreadsheet View, then choose the Import Data File... option.
Spreadsheet View, then choose the Import Data File... option.
Spreadsheet View Toolbar
The Spreadsheet View Toolbar provides a range of Tools that allow you to create objects in the ![]() Spreadsheet View.
Every icon in the Toolbar represents a Toolbox that contains a selection of related Tools. In order to open a Toolbox, you need to click on the corresponding default Tool shown in the Spreadsheet View Toolbar (GeoGebra Web and Tablet Apps) or on the small arrow in the lower right corner of the Toolbar icon (GeoGebra Desktop).
Spreadsheet View.
Every icon in the Toolbar represents a Toolbox that contains a selection of related Tools. In order to open a Toolbox, you need to click on the corresponding default Tool shown in the Spreadsheet View Toolbar (GeoGebra Web and Tablet Apps) or on the small arrow in the lower right corner of the Toolbar icon (GeoGebra Desktop).
Display of Mathematical Objects
Display of Spreadsheet Objects in other Views
If possible, GeoGebra immediately displays the graphical representation of the object you entered in a Spreadsheet Cell in the ![]() Graphics View as well. Thereby, the name of the object matches the name of the Spreadsheet Cell used to initially create it (e.g. A5, C1).
Graphics View as well. Thereby, the name of the object matches the name of the Spreadsheet Cell used to initially create it (e.g. A5, C1).
Using Spreadsheet Data in other Views
You may process the Spreadsheet Data by selecting multiple cells and right-clicking (Mac OS: Cmd-clicking) on the selection. In the appearing Context Menu, choose the submenu Create and select the appropriate option (List, List of points, Matrix, Table, Polyline and Operation table).
Operation Table
For a function with two parameters you can create an Operation Table with values of the first parameter written in the top row and values of second parameter written in the left column. The function itself must be entered in the top left cell.
After entering the function and the parameter values in the appropriate cells, select the rectangular area of the desired Operation Table with the mouse. Then, right click (Mac OS: Cmd-click) on the selection and choose option Create > Operation Table of the appearing Context Menu.
A1 = x y, A2 = 1, A3 = 2, A4 = 3, B1 = 1, C1 = 2 and D1 = 3. Select cells A1:D4 with the mouse. Then, right click (Mac OS: Cmd-click) on the selection and choose Create > Operation Table in the Context Menu to create a table containing the results of substitution of the inserted values in the given function.
Spreadsheet View Style Bar
The Spreadsheed View Style Bar provides buttons to
- show / hide the Input Bar (GeoGebra Desktop)
- change the text style to
 bold or
  italic
 - set the text alignment to
 left,
left,  center, or
  right
right - change the
 background color of a cell
 - change the cell borders (GeoGebra Desktop)
- open the Properties Dialog (GeoGebra Web and Tablet Apps)
- display additional
 Views in the GeoGebra window (GeoGebra Web and Tablet Apps)