3D tekenvenster

Sjabloon:Manual Page Sjabloon:Manual Page
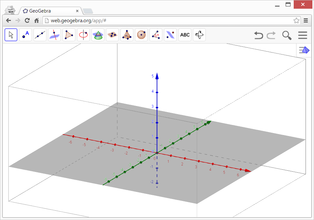
 3D Graphics View User Interface
Srandaard wordt het ![]() 3D tekenvenster geopend naast het
3D tekenvenster geopend naast het ![]() Algebra venster. Aanvullend wordt het Invoerveld getoond onderaan in het GeoGebra scherm (GeoGebra Desktop), of wordt een Invoerveld geïntegreerd in het
Algebra venster. Aanvullend wordt het Invoerveld getoond onderaan in het GeoGebra scherm (GeoGebra Desktop), of wordt een Invoerveld geïntegreerd in het ![]() Algebra venster (GeoGebra Web en Tablet Apps). De 3D Graphics View Menubalk staat bovenaan in het GeoGebra scherm, met de Undo / Redo knoppen in de rechterbovenhoek.
Algebra venster (GeoGebra Web en Tablet Apps). De 3D Graphics View Menubalk staat bovenaan in het GeoGebra scherm, met de Undo / Redo knoppen in de rechterbovenhoek.
|
Het ![]() 3D tekenvenster is naast het Algebra venster het enige venster in de 3D tekenvenster Schermindeling, maar je kunt ook een
3D tekenvenster is naast het Algebra venster het enige venster in de 3D tekenvenster Schermindeling, maar je kunt ook een ![]() 3D tekenvenster toevoegen in elke schermindeling via het Beeld Menu .
3D tekenvenster toevoegen in elke schermindeling via het Beeld Menu .
Het 3D tekenvenster aanpassen
Je kunt het ![]() 3D tekenvenster aanpassen aan het wiskunde onderdeel waarbinnen je wil werken. De basisinstellingen kan je wijzigen in de 3D Opmaakwerkbalk (b.v. tonen van assen, xOy-grondvlak, rooster). Daarnaast biedt ook het Voorkeuren Dialoogvenster meer mogelijkheden om het
3D tekenvenster aanpassen aan het wiskunde onderdeel waarbinnen je wil werken. De basisinstellingen kan je wijzigen in de 3D Opmaakwerkbalk (b.v. tonen van assen, xOy-grondvlak, rooster). Daarnaast biedt ook het Voorkeuren Dialoogvenster meer mogelijkheden om het ![]() 3D tekenvenster aan te passen.
Je kunt zo de layout van het scherm aanpassen naar je eigen wensen.
3D tekenvenster aan te passen.
Je kunt zo de layout van het scherm aanpassen naar je eigen wensen.
Wiskundige objecten maken
Constructies met de computermuis
Met de Knoppen in de 3D tekenvenster menubalk kan je wiskundige constructies maken in het ![]() 3D tekenvenster met de computermuis. Selecteer een willekeurige knop en lees de bijhorende tooltip die je toont hoe je de knop moet gebruiken.
3D tekenvenster met de computermuis. Selecteer een willekeurige knop en lees de bijhorende tooltip die je toont hoe je de knop moet gebruiken.
3D tekenvenster Opmaakwerkbalk
De 3D tekenvenster Opmaakwerkbalk biedt een brede waaier aan Macro's die het mogelijk maken om driedimensionale voorstellingen te maken van objecten in het ![]() 3D tekenvenster.
Bij elk icoon in de Opmaakwerkbalk hoort een rolmenu met gerelateerde knoppen. Je opent een rolmenu door te klikken op de getoonde knop in de opmaakwerkbalk of op het kleine pijltje rechts onderaan op het icoontje (GeoGebra Desktop).
3D tekenvenster.
Bij elk icoon in de Opmaakwerkbalk hoort een rolmenu met gerelateerde knoppen. Je opent een rolmenu door te klikken op de getoonde knop in de opmaakwerkbalk of op het kleine pijltje rechts onderaan op het icoontje (GeoGebra Desktop).
Invoer via het Invoerveld
Het ![]() 3D tekenvenster ondersteunt punten, vectoren, rechten, lijnstukken, stralen, veelhoeken en cirkels in een driedimensionaal assenstelsel. Je kunt zowel de Knoppen in de 3D tekenvenster Opmaakwerkbalk gebruiken, ofwel de algebraïsche uitdrukking voor deze objecten in het Inpvoerveld typen.
3D tekenvenster ondersteunt punten, vectoren, rechten, lijnstukken, stralen, veelhoeken en cirkels in een driedimensionaal assenstelsel. Je kunt zowel de Knoppen in de 3D tekenvenster Opmaakwerkbalk gebruiken, ofwel de algebraïsche uitdrukking voor deze objecten in het Inpvoerveld typen.
A=(5, -2, 1) in het Invoerveld om punt te creëren in een driedimensionaal assenstelsel.Via het Invoerveld kan je ook objecten creëren als oppervlakten, vlakken of ruimtelichamen(pyramiden, prisma's, bollen, cylinders, en kegels).
f(x, y)=sin(x*y) om he tovereenkomende oppervlak te creëren.Commando's
Naast de brede waaier aanCommando's in de andere vensters van GeoGebra, zijn er ook aparte 3D Commando's speciaal voor het 3D tekenvenster.
A=(2, 2, 0), B=(-2, 2, 0), C=(0, -2, 0), en D=(0, 0, 3). Typ het commando Pyramide[A, B, C, D]om de pyramide te creëren met basis ABC en top D.Wiskundige objecten verplaatsen in 3D
De knop Verplaatsen
Met de knop ![]() Verplaatsen Macrco kan je Vrije punten in het
Verplaatsen Macrco kan je Vrije punten in het ![]() 3D tekenvenster verplaatsen. Om een punt te verplaatsen kan je kiezen tussen twee modi door te klikken op het punt:
3D tekenvenster verplaatsen. Om een punt te verplaatsen kan je kiezen tussen twee modi door te klikken op het punt:
- Modus xOy-vlak: Je kunt het punt verplaatsen evenwijdig met het xOy-(grond)vlak met ongewijzigde z-coördinaat.
- Modus z-as: Je kunt het punt verplaatsen evenwijdig met de z-as met ongewijzigde x- en y-coördinaten.
Objecten verplaatsen met sneltoetsen
In het ![]() 3D tekenvenster, kan je de toets Sjabloon:KeyCode gebruiken om een geselecteerd object verticaal naar boven te verplaatsen en de toets Sjabloon:KeyCode om het verticaal naar beneden te verplaatsen.
3D tekenvenster, kan je de toets Sjabloon:KeyCode gebruiken om een geselecteerd object verticaal naar boven te verplaatsen en de toets Sjabloon:KeyCode om het verticaal naar beneden te verplaatsen.
Tonen van Wiskundige Objecten
Verschuiven van het Assenstalsel
You may translate the coordinate system by using the ![]() Move Graphics View Tool and dragging the background of the
Move Graphics View Tool and dragging the background of the ![]() 3D Graphics View with your pointing device. Thereby, you can switch between two modes by clicking on the background of the
3D Graphics View with your pointing device. Thereby, you can switch between two modes by clicking on the background of the ![]() 3D Graphics View:
3D Graphics View:
- Mode xOy-plane: You may translate the scene parallel to the xOy-plane.
- Mode z-axis: You may translate the scene parallel to the z-axis.
Alternatively you can hold the Sjabloon:KeyCode key and drag the background of the ![]() 3D Graphics View in order to translate the coordinate system. Again, you need to click in order to switch between the two modes while holding the Sjabloon:KeyCode key.
3D Graphics View in order to translate the coordinate system. Again, you need to click in order to switch between the two modes while holding the Sjabloon:KeyCode key.
Rotation of the Coordinate System
You may rotate the coordinate system by using the ![]() Rotate 3D Graphics View Tool and dragging the background of the
Rotate 3D Graphics View Tool and dragging the background of the ![]() 3D Graphics View with your pointing device.
3D Graphics View with your pointing device.
Alternatively you can right-drag the background of the ![]() 3D Graphics View in order to rotate the coordinate system.
3D Graphics View in order to rotate the coordinate system.
If you want to continue the rotation of the coordinate system when the mouse is released, you may use the option ![]() Start Rotating the View and
Start Rotating the View and ![]() Stop Rotating the View in the 3D Graphics View Style Bar.
Stop Rotating the View in the 3D Graphics View Style Bar.
Viewpoint in front of an Object
You may use the ![]() View in front of Tool in order to view the coordinate system from a viewpoint in front of the selected object.
View in front of Tool in order to view the coordinate system from a viewpoint in front of the selected object.
Zoom
You may use the ![]() Zoom In Tool and
Zoom In Tool and ![]() Zoom Out Tool in order to zoom in the
Zoom Out Tool in order to zoom in the ![]() 3D Graphics View.
Sjabloon:Hint
3D Graphics View.
Sjabloon:Hint
3D Graphics View Style Bar
The 3D Graphics View Style Bar contains buttons to
 show / hide the coordinate axes,
  the xOy-plane, and a
  grid in the xOy-plane
- go
 back to default view
 - change the
 Point Capturing settings
  start / stop rotating the view automatically
- adjust the
 view direction
  choose the type of projection
- open the
 Properties Dialog (GeoGebra Web and Tablet Apps)
 - display additional
 Views in the GeoGebra window (GeoGebra Web and Tablet Apps)
Style Bar for Tools and Objects
Depending on the Tool or object you select, the buttons in the Style Bar adapt to your selection. Please see Style Bar Options for Tools and Objects for more information.